Don’t know how to update PHP version in WordPress site? WordPress is primarily built with PHP programming language.
At times there is a need to update the PHP version. Using to the latest PHP version improves your WordPress website’s performance & speed dramatically.
In this article, we’ll show you how to update the PHP version of your WordPress website.
First let’s know, why we should update the PHP Version of WordPress Site
Table of Contents
Why Update To The Latest PHP Version In Your WordPress Website?
As discussed above, WordPress is primarily built with an open source programming language PHP.
When you update your WordPress website, you need to update your PHP version as well.
As of today, WordPress requires at least PHP version 7.4.21 or greater. The latest stable version available for PHP is 8.0.8.
With the latest versions of PHP your WordPress website’s performance is improved, since the background processes are run more efficiently & memory usage is also optimized.
This has an impacts on the speed of your WordPress website, making it faster & also reducing the load time.
How to Check the PHP Version in Your WordPress Website?
You can easily check the PHP version of your WordPress website from your own website.
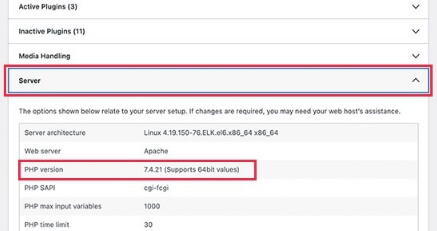
Simply, log in to the admin area of your WordPress website and go to the Tools » Site Health page & click on the Info tab.
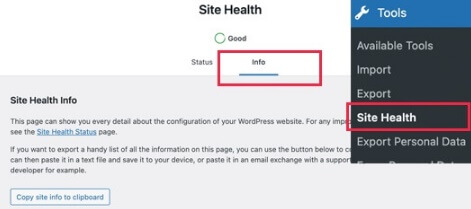
Now, go to the Server tab & click to expand. This section will show you all the server information along with the PHP version.
How To Update PHP Version In WordPress Site
All the top hosting companies allow you to easily change the PHP version used by your WordPress website.
We will show you a few examples from top hosting providers such as Bluehost, SiteGround & Hostgator.
How To Update PHP Version In Bluehost
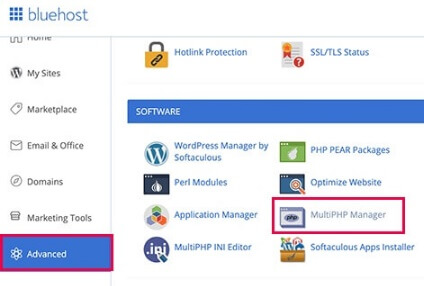
Log In to your Bluehost hosting account & go to the dashboard.
Click on the Advanced tab from the left column.
After clicking on the Advance tab, you will get multiple option on the right side of your screen. Click on MultiPHP Manager now.
After you have clicked on the MultiPHP Manager tab, you will be taken to a page where you will see the current PHP version for your WordPress website.
On this page, you can change to the Latest PHP Version.
How To Update PHP Version in SiteGround
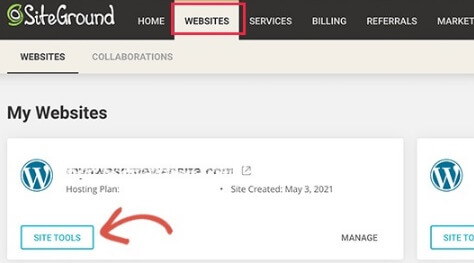
If you are using SiteGround hosting, then Log In to your SiteGround account dashboard.
Once you have logged in, you need to go to the Websites page and then click on the Site Tools button.
Now, go to DEVS » PHP Manager from the left column.
Choose between SiteGround’s Ultrafast PHP & Standard PHP. You can also change the PHP version by clicking on the Edit icon.

You will get a popup, where you will have to select Change PHP version manually under the Set PHP Version option.
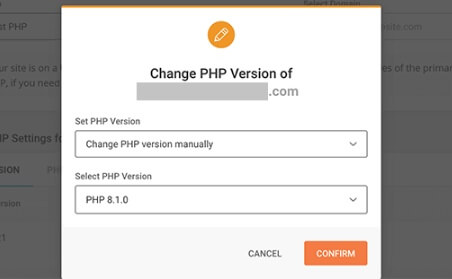
Now, select the latest PHP version, in this case PHP 8.1.0 from the drop down menu & click on the Confirm button.
How To Update PHP Version In HostGator
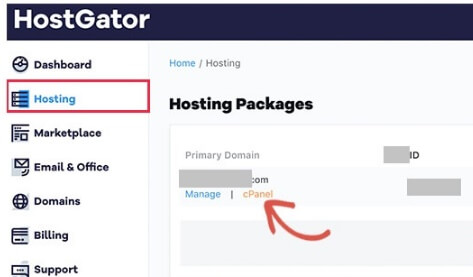
First & foremost thing to do is to Log In to your HostGator hosting account dashboard & click on the Hosting section.
From here you need to click on the cPanel link under your hosting account.
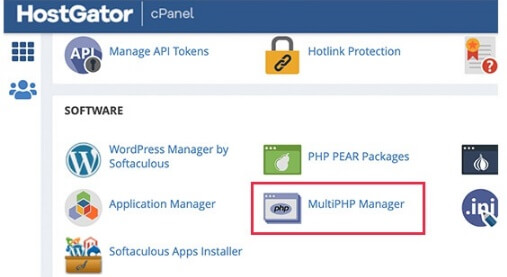
cPanel dashboard will be launched, where you can manage the advanced settings for your hosting account.
Scroll down to the Software section and click on the MultiPHP Manager icon.
Now, select your website and then choose the PHP version. Click on the Apply button to save the changes.
How To Update PHP Version In GoDaddy
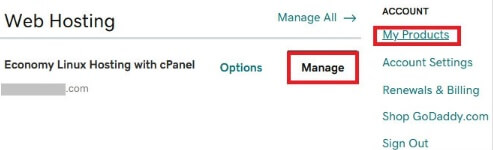
The first & foremost thing to do is to Log In to your GoDaddy hosting account dashboard & go to My Products section.
From there click on Manage in front of the website that you want to update to the latest PHP version.
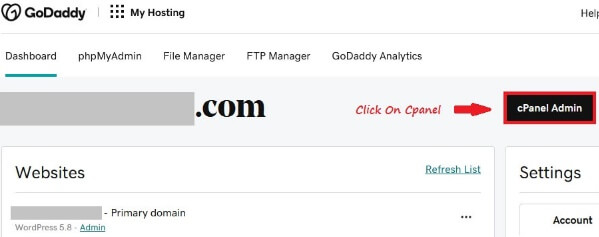
On the next screen, click on cPanel Admin button,
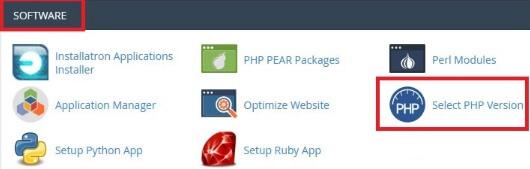
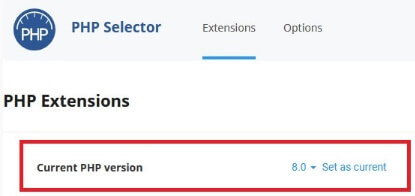
When you are in the cPanel section, go to Software tab & then click on Select PHP Version.
On the next screen, you will get an option to change your WordPress site PHP version. You can change to the latest PHP version, in this case from 7.4 to 8.0.
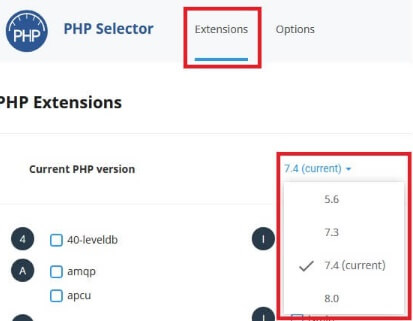
After selecting the latest PHP version, click on Set As Current, to save the changes.
You are all set & done now with updating to the latest PHP version for your WordPress website on GoDaddy hosting account.
What To Do After Updating PHP Version of Your WordPress Website
After updating the PHP version for your WordPress website, make sure that everything is working as expected.
You can open your WordPress website & go through it thoroughly, to check if it’s working fine & nothing is broken.
Log In to the WordPress Dashboard of your website & check the Info section to know, if the update has been successful.
Conclusion
Updating the PHP version for your website will keep your website healthy & error free.
This will allow you to gain momentum in this era of competition.
You may also like,