Table Of Contents
Introduction To Blogging
With the ever growing influence of internet, there are many people who have taken up blogging & are earning quite good from it.
Some people start a blog because they are passionate about it. Some people start a blog, so that they can express themselves to the general audience. And, some people start a blog because they want to earn that extra income from it.
Whatever the reason is to start a blog, everyone needs technical assistance to create one.
In this tutorial, you will learn, how to start a blog in WordPress with all the technicalities from scratch.
A very common error that people who are just starting out make, is choosing the wrong blogging platform between WordPress.org & WordPress.com.
WordPress.org is a self hosted platform where as WordPress.com is not.
Self hosted means, you can install any plugins or themes that you like & you can customize the blog as per your specifications.
In other words, the WordPress.org platform is completely free to use & make money on.
To know more, check out our post on, differences between WordPress.org & WordPress.com.
Requirements For A Blog
So without further ado, let’s first know, what are the immediate requirements to start a blog.
The 3 basic & immediate things that are required to start a blog are given below,
- Choosing A Niche
- Getting Domain Name
- Choosing Web Hosting
So, let’s have a look at all the 3 basic requirements in detail.
Choosing A Niche
Choosing a niche is the most important things to do before your start a blog. Niche is nothing but a specific area in which a person has interest & expertise. One can’t just go on writing about a topic in which the person has no interest or expertise.
Say for example, if you are a fashion designer, you can’t just start a blog in an engineering niche & vise versa.
One should start a blog in the niche, that he or she has knowledge in.
Also, interest plays an important part while choosing a niche.
If you have no interest in the niche that you are blogging about, then you should away from that niche.
Because, sooner or later, you will give up on the blog.
And that’s why it’s important to take your time while choosing a niche, so that, you get it right.
Check out, top 20 blogging niches for bloggers.
Getting Domain Name
A domain name is the name of your website.
In my case it is myblogmaster.com where myblogmaster is the “Primary Domain” & .com is “Top Level Domain (TLD)”.
.COM is also known as an extension to the primary domain.
Some websites have a .COM extension where as some have .NET extension.
To know the difference between them, check out our article on, important difference between domain extensions COM And NET.
You can give your website any Domain Name that you want.
But, you will have to get that name from the Domain Registrar.
Or, if you get a Web Hosting from Bluehost or HostGator, you will get the Domain Name free.
Choosing Web Hosting
There are many companies that provide a Domain Name & Web Hosting space.
Major players in the market are, Bluehost, HostGator & SiteGround.
- If you are looking for an affordable Web Hosting, I would recommend Bluehost.
- For a Web Hosting with great customer support, I would recommend HostGator.
- And, for a super fast Web Hosting, I would recommend SiteGround.
You can check out the features, plans & pricing of all these Web Hosting providers by clicking on the links below,
- Bluehost Web Hosting Features, Plans & Pricing.
- HostGator Web Hosting Features, Plans & Pricing.
- SiteGround Web Hosting Features, Plans & Pricing.
As mentioned above, Bluehost, HostGator & SiteGround are the most well known & adored web hosting service providers, that are currently available in the market. And that’s why, we are going to set up our WordPress Blog on all of them.
Start A Blog With Bluehost
In this article, you will learn how to start a blog with Bluehost hosting provider. Bluehost is very well known for it’s affordable web hosting. Moreover, WordPress officially recommends Bluehost as well.
If you are a newbie then I would suggest you to start a blog with Bluehost hosting as it’s the most affordable & has a user friendly interface.
So, without further ado, let’s dive right in to the topic of stating a blog with Bluehost.
We will discuss 2 aspect of starting a blog,
- Get Domain Name And Hosting From Bluehost
- Install WordPress blog on Bluehost
Get Domain Name And Hosting From Bluehost
So, without further ado, let’s start the process of getting a free Domain Name, a free SSL Certificate & a Web Hosting space from Bluehost.
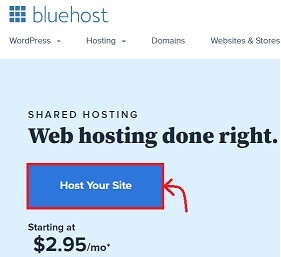
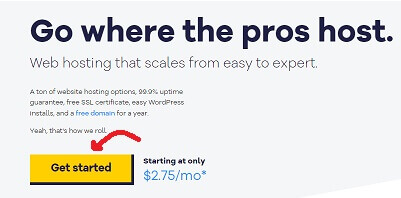
1). Go to the Bluehost Homepage & click on the “Host Your Site”.
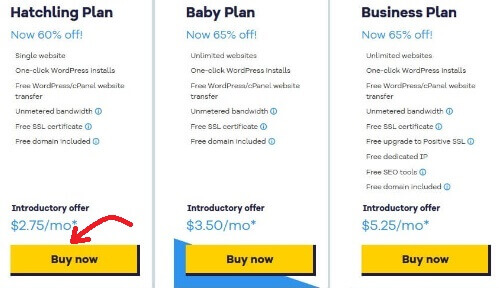
2). On the next page, you will find many Bluehost Plans & Packages.
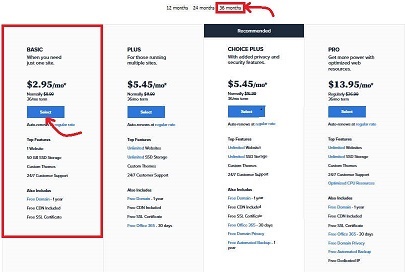
You can select any package that you are comfortable with.
Usually, I recommend beginners to get the BASIC plan for 36 Months period, since that’s the most cost effective.
Also you will get a heavy discount for this plan & the price will drop down from $2.95 per month to $2.65 per month.
Having said that, you can choose the BASIC plan for 12 Months as well, if you don’t want to spend the money for a 36 Months plan.
For this tutorial, we will take the BASIC plan for 36 Months plan.
Click on the Select button for the BASIC plan.
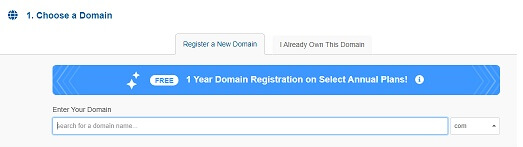
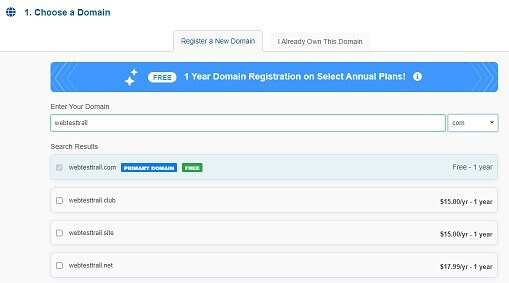
3). On the next screen, enter your Domain Name & click on Next.
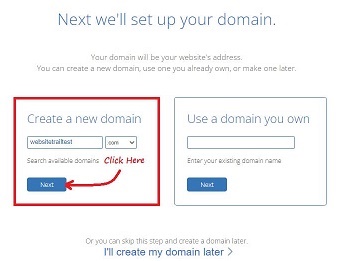
You can fill in any Domain Name you want.
You can also change the extension from .COM to .NET or to any other extension that you want.
Alternatively, you can also create a domain name later, after you have purchased the hosting.
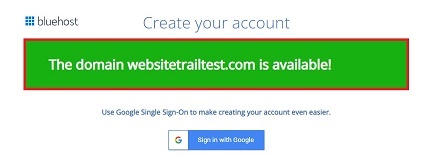
4). On the next screen, you will get a message whether your Domain Name is available or not.
Scroll down below & fill in all your details such as Account Information, Package Information, Package Extras, Payment Information.
5). You Account Information will have fields like,
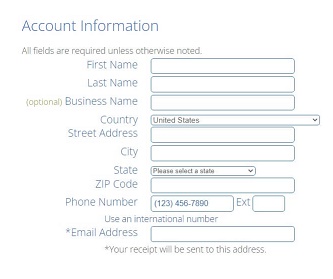
- First Name – Your first name.
- Last Name – Your last name.
- Business Name – Your business name (if you have any – this is optional).
- Country – Your country name where you reside.
- Street Address – You street address.
- City – Your city name.
- State – Your state name
- Zip Code – Your zip code number.
- Phone Number – Your phone number (also choose the extension code for your country).
- Email Address – Your email address (the receipt will be sent here).
Fill in all these fields with relevant information.
6). After you have finished filling your Account Information, scroll down to your Package Information.
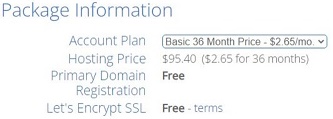
You don’t need to fill anything here. The Package Information will get filled by default depending on what package you had selected.
7). Scrolling down further, you will find the Package Extras information.
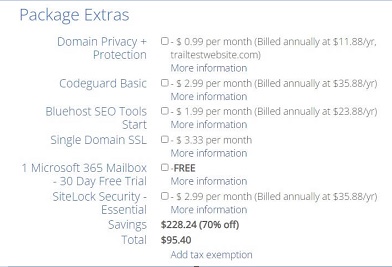
You will find that Domain Privacy + Protection, Codeguard Basic & Sitelock Security are pre-selected.
Uncheck them. You can add these options later, if needed.
8). Again scroll down to the Payment Information & fill in your Credit Card Number, the CCV2 Code which is on the back of your Credit Card & the Expiration Date for your Credit Card.
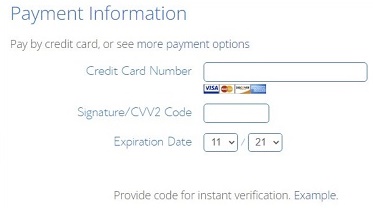
If you don’t have a Credit Card then use a Debit Card (Visa or MasterCard). It works just fine.
You can also alternatively choose to pay with PayPal as well, by clicking the more payment options link.
9). Now, scroll down to the Terms & Conditions section.
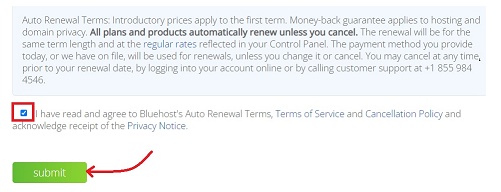
Check the Check Box to agree to all the terms & conditions & click on the Submit button.
You will get a confirmation email on the email address that you provided.
Click on the confirmation link to login to your account & change the password.
A Set Up Wizard will guide you install WordPress site on your Bluehost Web Hosting.
Alternatively, you can skip all the steps required for the Set Up Wizard & directly go to the Bluehost Dashboard.
Install WordPress Blog On Bluehost
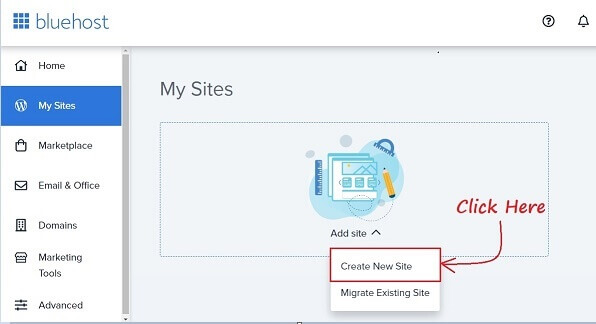
1). Once you are on the Bluehost Dashboard, go to My Sites => Add Site => Create New Site.
2). On the next screen, you will get two options. You can choose between these two options, depending on your level of comfort with installing WordPress.
For this tutorial, we will go with the Limitless Customization option, so that you can customize your website the way you want it.
Click on Get Started.

3). On the next screen, click on Advance button & fill in the following details,
- Site Name – Your website name.
- Site Tagline – Tagline for your website.
- Email Address – Email Id for your website.
- WordPress Admin Username – Username for your website
- WordPress Admin Password – Password for your website.
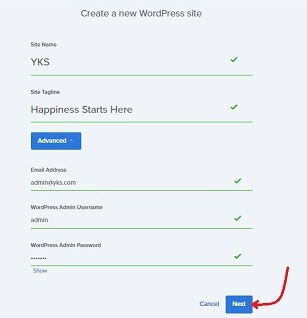
After you have filled in all the information, click on Next.
4). On the next screen, choose your Domain Name from the list.
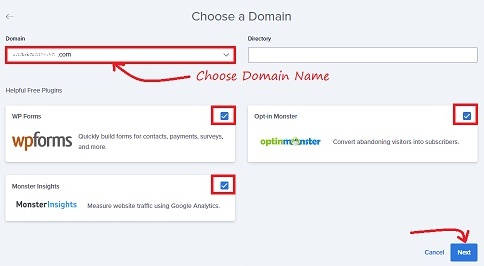
Also, you will get a default option to install plugins such as WPForms, OptinMonster & MonsterInsights.
If you want to install these plugins, you can keep the Check Boxes checked.
But, if you don’t want any of these plugins, then Uncheck the Check Boxes & click on Next.
Now, wait for a couple of minutes & your WordPress site will be installed successfully.
5). After your WordPress site is installed successfully, click on Login To WordPress link.
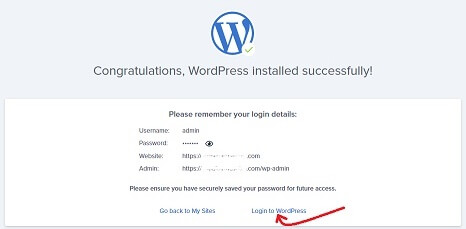
This will redirect you to your WordPress site Dashboard.
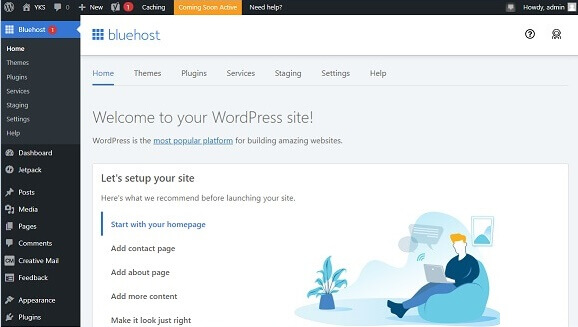
You are all set & done now.
Start A Blog With HostGator
HostGator is known for it’s prompt customer support & is also very affordable hosting provider after Bluehost.
You can easily install & Set Up your WordPress blog on HostGator as user interface is quite friendly.
HostGator is one of the most important players in the market of Web Hosting. If you are a newbie who wants thorough assistance then this is the hosting provider for you.
So, without further ado, let dive right in to the topic.
We will discuss 2 main things in this tutorial,
- Get Domain Name & Hosting from HostGator
- Install WordPress blog on HostGator
Get Domain Name & Hosting From HostGator
Let’s start the process of getting a free Domain Name, a free SSL Certificate & a Web Hosting space from HostGator.
Go to HostGator homepage & click on Get Started.
You will be redirected to the hosting plans of HostGator.
I would recommend you to take their Hatchling Plan, if you are just starting out.
For this tutorial we will buy the Hatchling Plan for 36 Months as that’s the most cost effective plan.
Click on the Buy Now button of your selected plan.
On the next page, you will have to fill in your information such as,
1). Choose A Domain
In this section, you will have to create a Domain Name by filling the information under “Register A New Domain” tab or if you already have a domain name then you can use it by going to the “I Already Own This Domain” tab.
If you want to register for a new domain then enter the Domain Name in the box under the “Register A New Domain” tab & check if it is available.
Also, select the extension you want to use for your website. With the discount, you will get the Domain Name for free.
2). Choose A Hosting Plan

You can select you plan in this section.
I would recommend you to get a 36 Months plan as that is the most cost effective of all the plans.
But if you don’t want to spend money for a 36 Months plan then you can also get the 24 Months or 12 Months plan.
3). Create Your HostGator Account
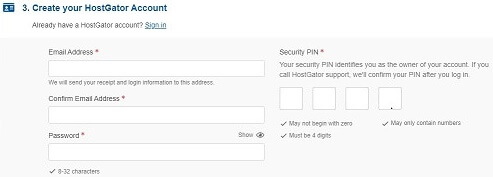
In this section you will have to Create Your HostGator Account.
Fill in your Email Address & Password. Confirm your Email Address again
Also enter the Security PIN number. It can be any 4 digit number that you want, for example “1234“.
The Security PIN number identifies you as the owner of your account.
If you ever feel the need to call HostGator support, then you will require this number.
4). Enter Your Billing Info

Enter all your billing information such as, First Name, Last Name, Company (optional), Phone Number, Address, Country, City, State, Zip Code, Payment Type, Name On Card, Credit Card Number, CVV Code & Card Expiration Date.
A Debit Card can also be used for purchasing the hosting if, it’s a Visa or MasterCard.
You will find the CVV Code at the back side of your Credit Card or Debit Card.
Alternatively, you can choose to pay with PayPal as well.
5). Add Additional Services
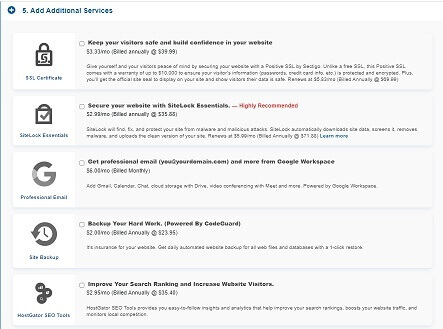
In this section, you can Select the Services that you want by simply checking the CheckBox.
The available services are,
- SSL Certificate – You don’t need to select this as with our special link you are getting a SSL Certificate for free.
- SiteLock Essentials – You can select this for hiding your personal information on the internet.
- Professional Email -You don’t need to select this option as “Email Account” can be created in “cPanel” for free.
- Site Backup – If you wan to back up your website regularly then select this option.
- HostGator SEO Tools – You can select this, if you want to improve your search rankings.
6). HostGator Coupon Code
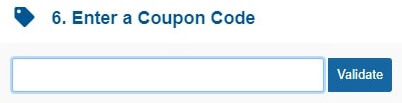
If you have a special Coupon Code you can enter it here to get the discount.
If you buy HostGator through us, you automatically this special discount.
7). Review Your Order
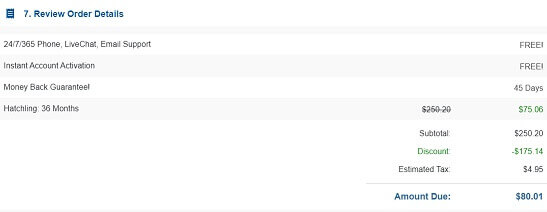
Here you can review your order to confirm the plan you have taken.
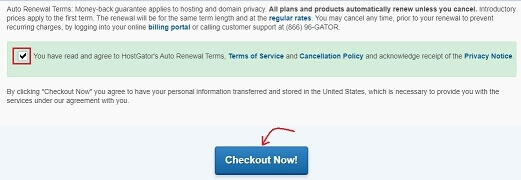
Now, scroll down & accept the Terms & Conditions by checking the CheckBox & click on Checkout Now.
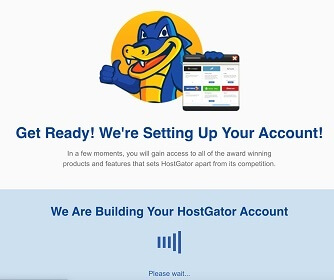
After checking out, HostGator will start Setting Up your account. It might take a couple of minutes.
On the next screen your will find a questionnaire.
You can fill it, if you want or you can skip it completely. I would recommend skipping the questionnaire as filling it is not mandatory.

On the next screen, you will be asked to start building your WordPress website,
Simply follow the given instructions from the Set Up Wizard & your WordPress website will be installed automatically.
You can alternatively, log in to your HostGator Dashboard & install WordPress website from there as well.
You will also receive an “confirmation email” in the inbox of the Email Address that you provided.
Click on that “confirmation link” to confirm your Email Address.
You are now all set now to log in to your HostGator Account.
Install WordPress Blog On HostGator
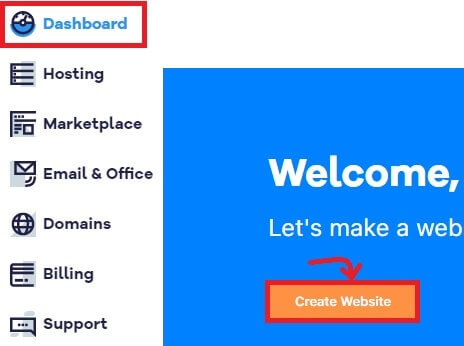
1). Go to the HostGator Dashboard => Create Website.
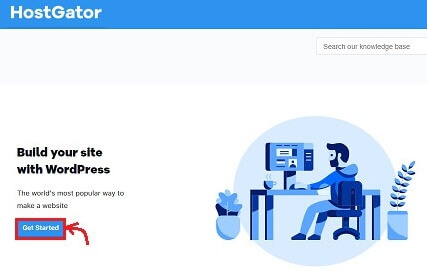
2). On the next page click on Get Started button.

3). After you click on the Get Started button, the process of creating your WordPress Account will get started.
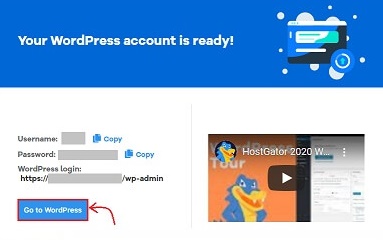
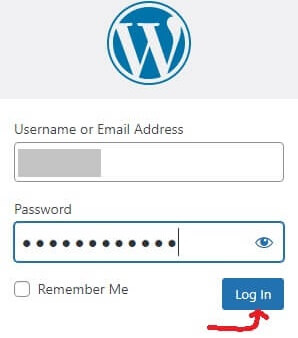
Wait for a couple of minutes & your WordPress Account will get created. Now, click on Go To WordPress.
It will take you to the Admin section of your WordPress site, where you can Log In with your Username & Password.
4). After logging in to through your WordPress Admin, you will go to the Dashboard of your website.
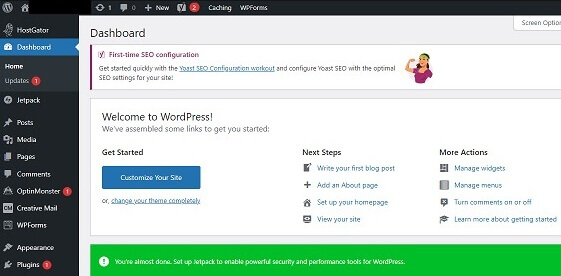
You will find many plugins pre-installed. You can keep the plugins that you want & uninstall the remaining.
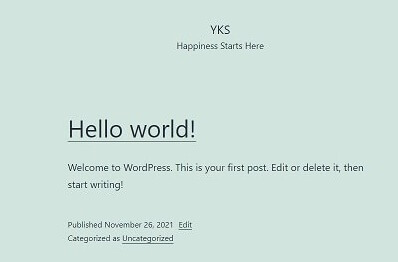
5). Your website is live now. The front site of your website will look something like,
You are all set & done.
Start A Blog With SiteGround
In this section you are going to learn, how to start a blog with SiteGround hosting. SiteGround is one of the fastest hosting providers.
This article will cover mainly 2 topics,
- Getting a domain name & hosting space from SiteGround.
- Installing WordPress blog on SiteGround.
So without further ado, let first get the domain name & hosting space from SiteGround.
Getting Domain & Hosting From SiteGround
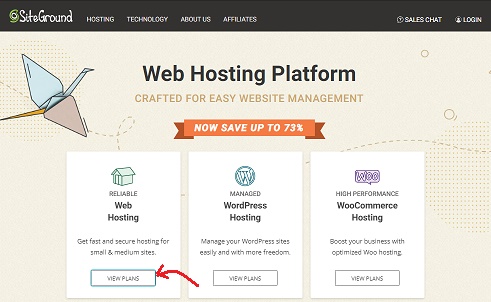
1). Go to SiteGround homepage & click on View Plans under Web Hosting.
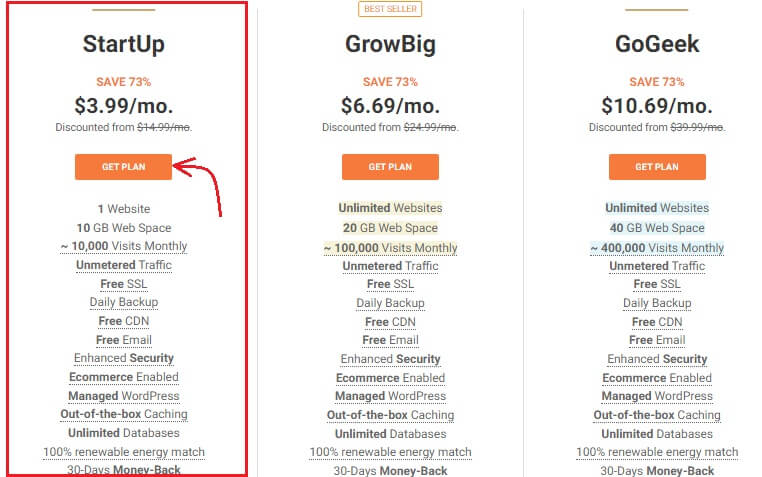
2). On the next screen click on Get Plan under StartUp.
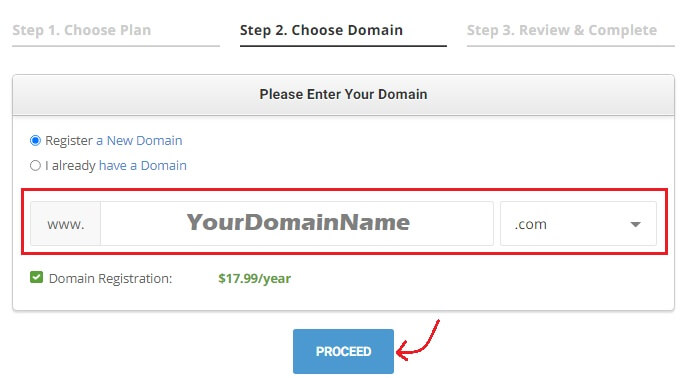
3). Now, assuming that you are a newbie, fill in your Domain Name on the screen below & click on proceed.
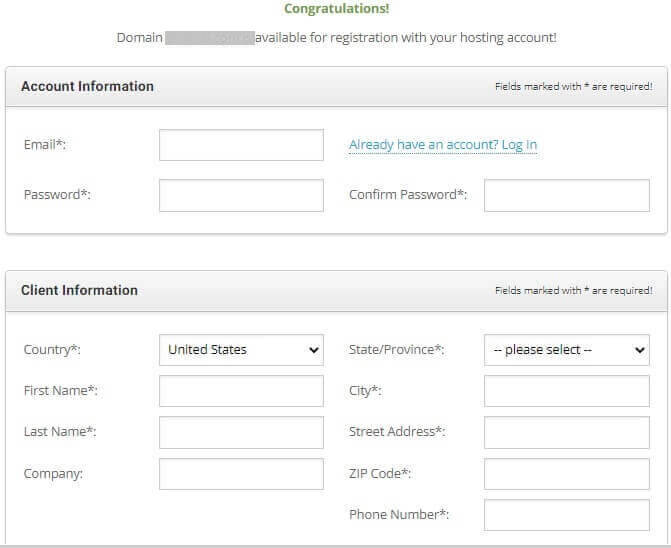
4). Scroll down & fill in all the relevant Account Information such as Email Id & Password. Also fill in the Client Information section such as your country, first name, last name, company, state/province, city, address & phone number.
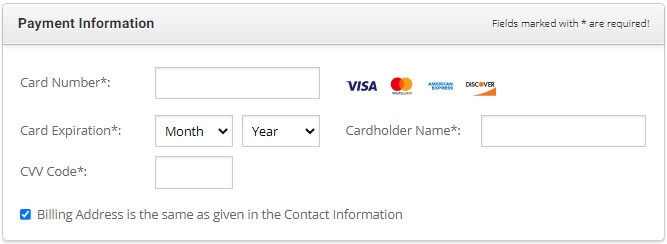
5). Scroll down & fill in your Payment Information which includes the Credit Card details such as your Credit Card Number, Name on your Credit Card, Expiry Date of your Credit Card & CVV Code.
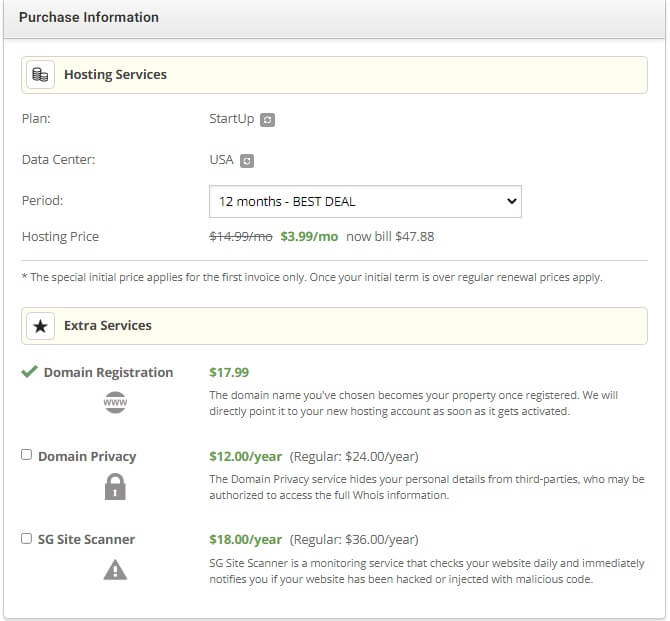
6) Scroll down further & you will see your Purchase Order Information which includes your Plan, Data Center, Period & Price.
Also, if you want you can add Domain Privacy & SG Site Scanner to your Purchase Order.
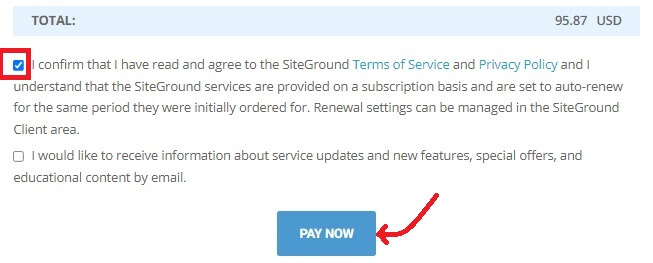
7). Now, just click on the Term & Conditions of SiteGround & then click on Pay Now.
You may receive a confirmation email in inbox of the email address that you provided. Click on that confirmation link to confirm your purchase.
Installing WordPress Blog On SiteGround
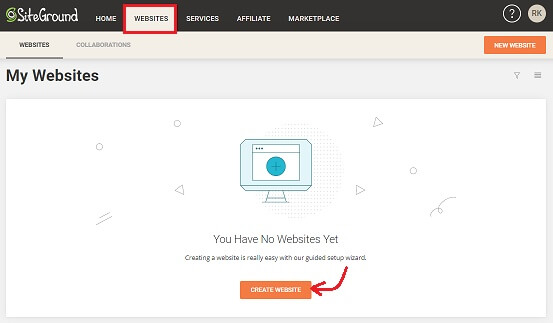
1). Log In to your SiteGround account. Go to Websites tab from your dashboard & click on Create Website.
2). On the next screen you will get 3 options,
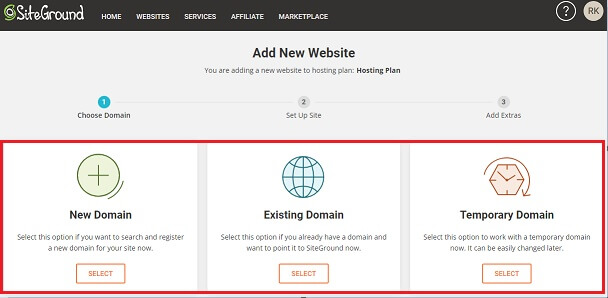
- New Domain – Select this option if you want to purchase a new domain.
- Existing Domain – Select this option if you already have purchased the domain.
- Temporary Domain – Select this option if you want to set up your blog on a temporary domain.
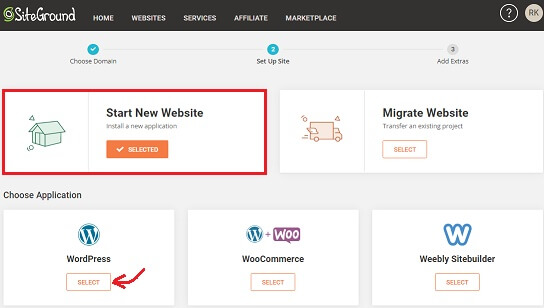
3). On the next screen, you will get 2 more options,
- Start New Website – Select this option if you are doing a fresh install for you blog.
- Migrate Website – Select this option if you are migrating your blog.
Since we are starting a new website, we will Select Start New Website => then Select WordPress.
4). After you Select WordPress from the above step, you will be prompted to enter your Installation Details.
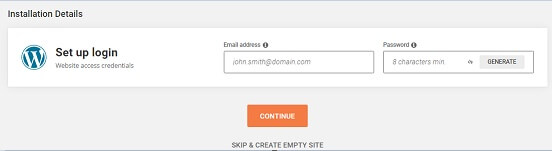
Fill in your Email Address (name@domain.com) & Password for your WordPress blog & click on Continue button.
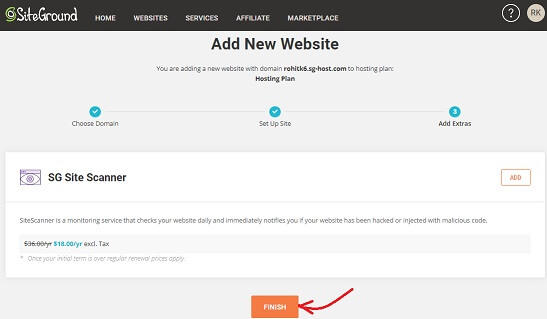
5). On the next screen, you will get an option to add a few packages from SiteGround eg: SG Site Scanner. There is no need to add any extra packages immediately, you can always add them later.
Simply click on FINISH to complete the installation.
6). After you click on the FINISH button from the above step, you blog will get created in a couple of minutes & you will get 3 option to access your WordPress blog,
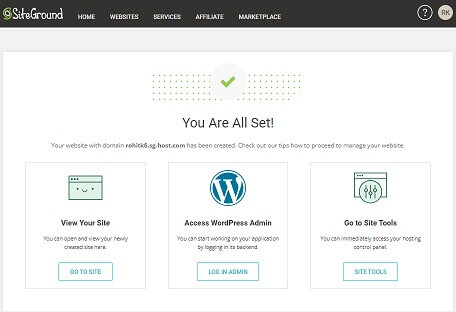
- View Your Site – Click on Go To Site to visit your WordPress blog.
- Access WordPress Admin – Click on Log In Admin to go to your WordPress Dashboard.
- Go to Site Tools – Click on Site Tools button if you want to check out all the tool that SiteGround is offering.
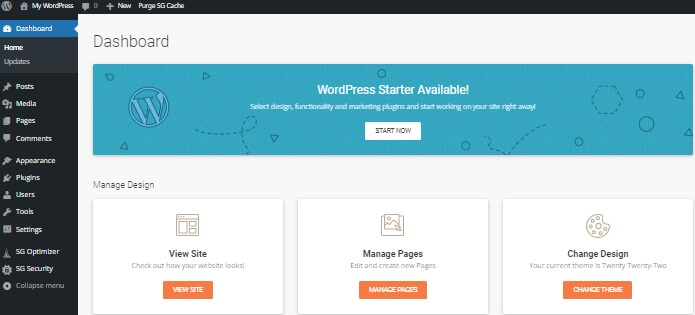
The WordPress Dashboard of your blog will look something like the below screenshot,
The frontend of your blog will look something like the below screenshot,